Showing posts with label decorating. Show all posts

Monday, October 1, 2012

Birthday Party for My Littlest Girl

Look who is three...


I know! I can hardly believe it.  For the first time in (what?) twelve years our family is out of diapers and sleeping through the night.  She insists on being called a kid, not a toddler or baby, follows me like a shadow and begins each and every sentence with "mommy?"  I love her so much!  What a fantastic reason for a celebration. Of course it is no secret that  I adore a well planned party.  My fingers crave unique homemade decorations and I tend to get a little worked up the days before, but it is always for the best cause, my family.  Plus I love a challenge.  

This year she voiced her first real birthday party request...OWLS.

Owls?  Really?  Well, okay...

When I picture owls I imagine woodlands. I think I crossed the line between normal party decorations and actually crazy this time when I pinned and taped tree limbs to my walls.  Sticks and branches  became trees and thirty balloons became owls.


A little bit whimsical...


A little bit magical...


 Well, at least it was only thirty balloons.  Last year it was 100...


I did some quick searching for "balloon owls" and came up with this for inspiration.  I wanted a truer owl.  Using a scalloped and circle punch I layered big wide eyes.  Simple half ovals became wings and triangles became beaks and ears.  (I assembled the shapes first then taped them onto the inflated balloons.)


aren't they so adorable...

A couple strings of my favorite bunting and a fun owl tree and our place was set. 


Oh and the entire menu was planned around this deli meat and cheese tray idea.  (Soups, chili, sandwiches, veggies and caramel and chocolate apples for dessert)  Achieved? Eh.. close enough.


So all in all this party cost me two pack of balloons, four sheets of scrapbook paper and adhesives.  Is it silly that I'm completely motivated to put together blog-worthy parties for a couple bucks?  Nah... Now I have yet another "theme" to add to my accomplished list.

And a couple more pics of my owl loving baby...


............................................................................

Come back on Friday for my recipe for chocolate caramel apples, made with vegan caramel and no corn syrup.  I am as surprised as you are that this one worked!  See you again soon, promise!


Monday, April 30, 2012

A Bathroom Redecorated...

I'd gotten tired of my first floor bathroom.  You know, the one that does double duty as a pretty guest bath as well as a convenient place to rinse off sandy children.  It was too dark (red, tan and brown) and just worn out.  After painting the kitchen (post soon to come!) I had a new fresh color to work with.  So with only the cost of a new shower curtain I pulled together a new look.

the new shower curtain

After raiding a friends dilapidated barn with only a single glove and a wonder bar (awesome), I scored this crate.  In its not so distant past it was a nest box in a chicken coop.  Needless to say I scrubbed this thing until my arms almost fell off.  Then after some sanding and a coat of stain, I had a nice clean box.  At first I was going to throw it in the corner and pile it with clean towels but I had been looking for a cabinet to hang on the wall.  Could I mount the crate to the wall?


Definitely.  It's rustic and old fashioned.  And no matter how hard I try or how much I want to avoid it, that is the direction this house will always take.  Use what you have...

The next project was something to fill the opposite wall.  I love browsing prints and frames at stores but can never convince myself to buy any.  I'm addicted to originals.  I built this frame using old fencing and staples.   (My first solo radial arm saw project.  I was scared to death!)


Some paint and some stain to distress it and I was happy.  I had seen bloggers framing sticks and thought I would give it a try with some of my grape vine trimmings.


Another hit.  Wow, could this room be coming together so fast with really nothing but time invested?

The soap dish?  The the base of a planter.  Painted and stained.


The curtain?  Ruffles?  Me?  Hmm... not so sure if I'll keep this one but I'm trying it.  Just muslin and literally scraps I ripped off an old table cloth in the basement.  The only thing I do like is the unfinished look.


Keeping with the "bird" theme (nest box, shower curtain, twigs... see it now?) two brass birds with a coat of white spray paint.  So pretty perched on my mirror ledge.  


Homemade milk glass with upcycled food jars... think vanilla extract, grinder spices and artichoke hearts.


I'm pretty sure that I took about one hundred photos of this tiny room. That's about 95 too many even by my standards.  But in my defense I have been suffering with this room for years. So just a few more if you please...


(Ok, a remodel  for the price of a shower curtain AND a stack of fluffy new hand towels...)

Overall, I like it.  So much brighter and clean.  For a couple days every time I walked past the room I had to stop, turn on the lights and sigh.


A finished project.

One room down...


Friday, December 9, 2011

Lovey Dovey Christmas Wreath

Well, we might as well call this "wreath week" here at Two Blue Houses.   We are keeping things simple and real on the blog and at my home the welcome of a new season always begins with a wreath.   


This is indeed the same wreath I did here and yet once again at a "Friends" supper we hosted in the fall (geesh, I'm embarrassed to admit that I have not posted pictures...).  I'm not sure when I'll give it up and move on.  There are so too many possibilities.  I was still loving the all white (from its most recent upgrade).   


Red felt roses, moss and a few twigs... The ornament is a dove and I'm pretty sure it was given to me by Lauren (because all my favorites are from her).  How do you think it looks against my yellow door?


A few notes about our Advent Calendar... I know it is only a couple days into the plan but I'm happy to say it is so much fun.   I catch the glitter shimmering off the handmade snowflakes strung across the kitchen window and actually caught the sunset peeking through them.  This very evening we did Christmas puzzles and challenged the boys to create scenes with their vast Lego collection.  


Let me tell you, these creations are not as simple as they look.  I consider myself pretty crafty and thought it would be no problem to enlist my crew to build a brick nativity.  I tried to build a manger for a Lego baby Jesus and after only moments gave up and instead opened up a Lego guy hospital.   As you can see, they gave up and had a Santa making contest.

Then spent a few minutes in front of the seasons first fire... with peppermint hot cocoa of course!


That is our advent calendar hanging over the stove.  As you can see, it operates on a day to day basis.  Last year we planned the whole month ahead of time and then each night had to rearrange.   Not sure which I prefer, but it is working and all the stress is on me; the kids couldn't care less.  They are simply so excited to turn the card!

Lots planned for this weekend... two kids birthday parties, a shopping trip, round one of decorating, and a Sunday supper with the extended family.  Whew, I need a nap just thinking about all of that.  Hopefully there will be plenty of cuddling time by our fire too!


Thursday, December 8, 2011

Quick, Cheap Wreaths

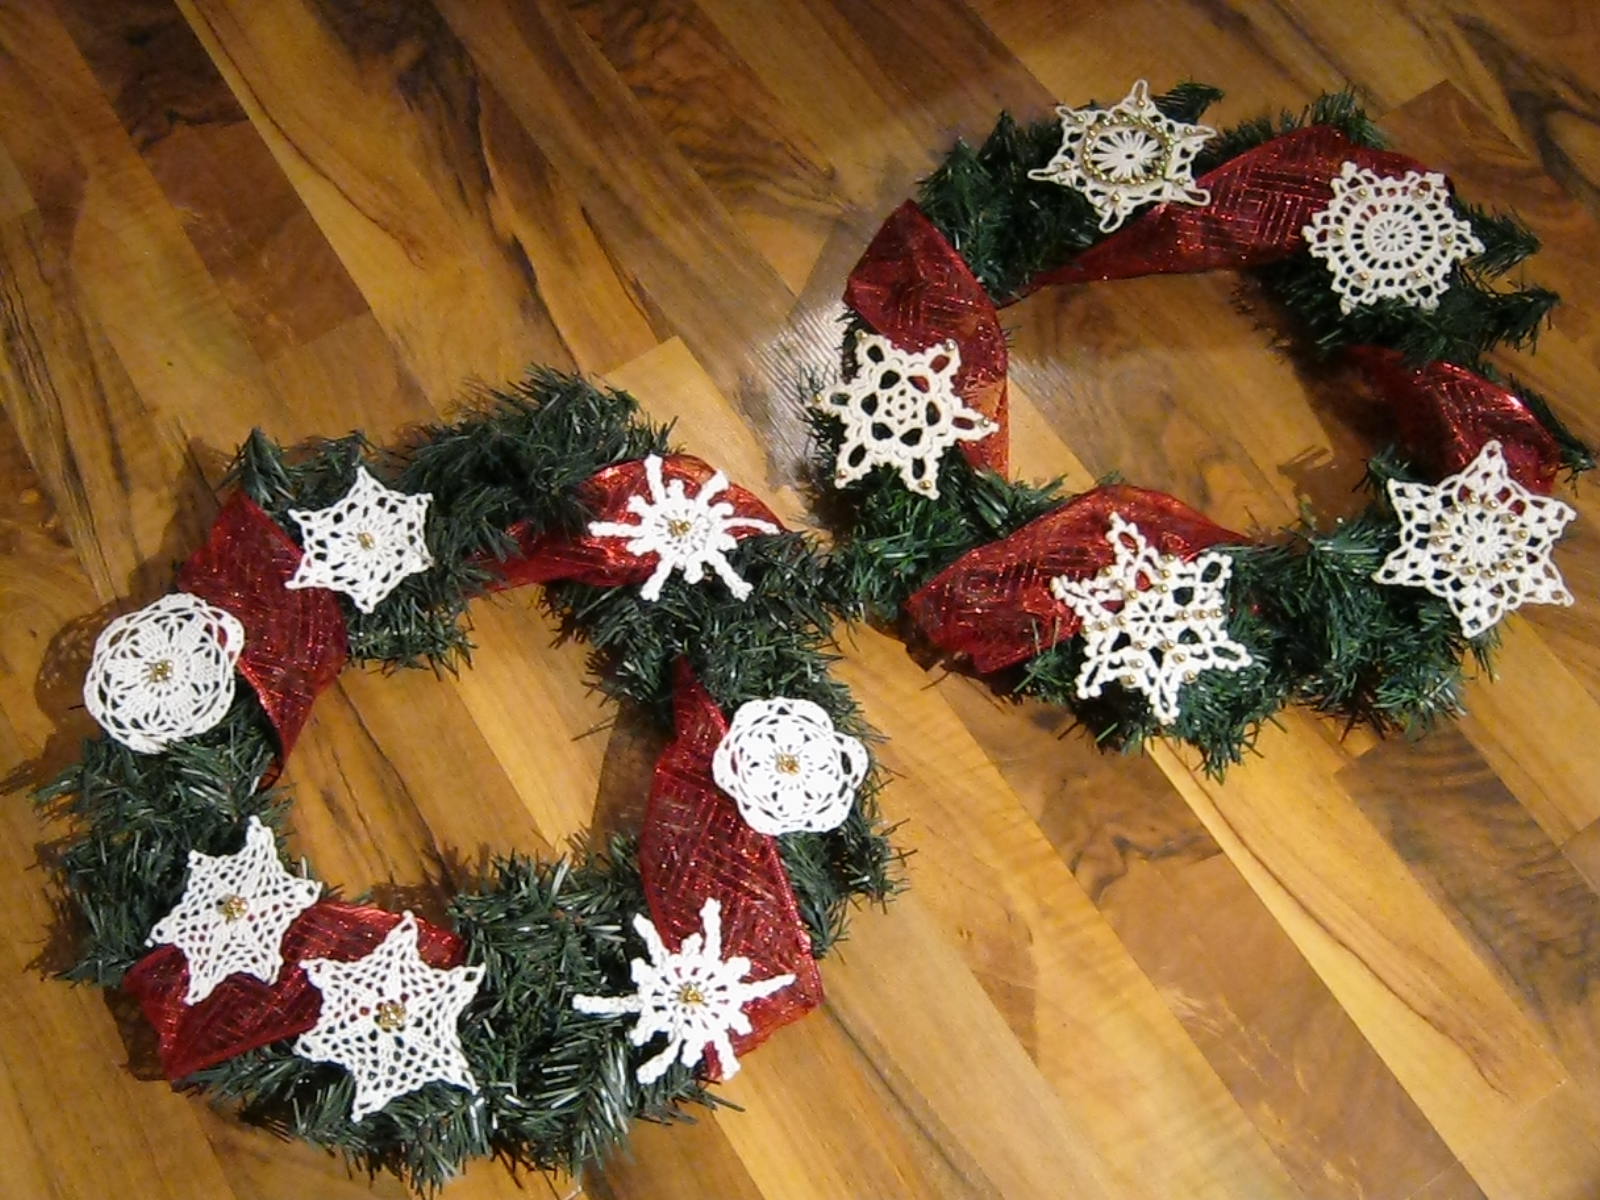
You already know that I love wreaths and I recently shared a sprucing up of another wreath handed down to me. I was looking for a quick way to make two for my outside doors without spending any money and not feeling bad if they get wrecked by the weather. With supplies I already had I quickly put together these two wreaths. Perhaps an hour project if you don't have a sick baby needing your attention constantly. Sure felt great being creative though.

Supplies: 
Anything you already have and two dollar store wreaths from a previous years decorations. I had some leftover red ribbon (maybe four feet), vintage cotton snow flakes handed down to me, a glue gun, and some gold beads (not shown in first picture). Basically this cost me nothing this year but time and energy. 


I removed the red ribbons from the wreaths (and actually threw them out they were that yucky!) and spread out the needles so they looked fuller. I cut the ribbon evenly in half, attached one end on the back of the wire frame of the wreath with hot glue and wrapped it around the wreath. Once I was happy with how the ribbon looked I hot glued the other end to the wire frame. 

Next, I cut off the hangers on the snow flakes and positioned them on the wreaths until I was satisfied how they looked. With some more hot glue I secured the snow flakes in a couple places each to ensure they wouldn't blow off in the outside wind. For a final touch, I hot glued on some cheap gold beads I had left over from a project Jackie and I did years and years ago now with baby food jars.  


The best thing about these wreaths is that there is room to grow. I am not convinced that they are finished and they can easily be pulled back apart without feeling any guilt if you aren't happy with the outcome. I really wanted to make a fresh wreath but didn't feel like sabotaging my pine trees to make them. Perhaps next year we will buy a real tree and I can make wreaths from cutting then...

I think one of my next projects will be snow globes. Martha Stewart Living several years ago featured a cute homemade snow globe project but I just LOVE how Ashley Ann's snow globes turned out. Darling!!!

---------------------------------------------------------------------------------------------------------------------

Update 12/8/2011:
My lovely husband (with a chuck of gauze in his mouth after an afternoon getting teeth extracted) hammered two nails into my outside doors before heading upstairs for bed. Here is the finished and hung wreath(s)


While sitting in the dentist's lush waiting room (our dentist Dr. Maggie A. Kleem in Berea, Ohio is AMAZING!!) playing with the baby, drinking a large, wonderful cup of coffee, and looking at the December issue of Woman's Day, I was inspired by their creative Christmas wreaths. Gulp! They are gorgeous and put my two little wreaths to shame. So here they are to be inspired with me and visit Woman's Day for the how to. Be kind in comparing!


Tuesday, September 6, 2011

Paper Wreath

I picked up an interesting book a couple weeks ago.  As you know, I love books.  To read, yes, but also as craft inspiration.  This naval book full of equations, charts and other math stuff needed to be on my walls.  What can I say?  This house like math.


A couple of Christmas' ago, I made this book wreath.  I also made Lauren a larger one.  Staring at a bare wall (ha! most of my walls are still bare...) I knew I wanted a big paper wreath too.   

Start with a light cardboard circle.  I'm sure you have at least one empty cereal box in your recycling.  Grab it.  Trace a dinner plate for a large wreath and a salad plate for the little one.  Or do both!  Cut a hole in the middle.


Cut a six inches of twine and make a loop.  Glue it to your cardboard circle.  


Add more glue and top it with a small section of more cardboard.


Cut or tear pages from the book.  These were coming out ragged when torn so I trimmed them with a blade and a straight edge. 


For the large wreath you need both full pages and half pages.  For the small wreath, only the half pages.   Based on my dinner plate, I needed about 30 of each.


Begin rolling in the bottom corner.   


It doesn't matter how tight or loose you roll.  In fact you need some of each and even in between to make your wreath worth.  Plus the variety adds interest.  


When you get to the other corner, add a drop of hot glue then continue rolling.  This is my little way not to burn my finger over and over again.  Hold it there on the table just for a second to allow the glue to cool.


Do the same with the half sheets of paper.  And now you have a collection of paper cones, all different sizes.


Starting with the large cones for the large wreath, glue to the cardboard circle.  I like to work in quarters to make sure they are straight.  Vary the placement of the paper cones so they aren't perfectly straight in the middle.


Secure a few, then jump ahead and glue.  Now fill the space.


Even if the space is small, you can wiggle a cone into the spot.  


There will be gaps.  (If you are making the small wreath gently separate cones and add a drop of hot glue then press with the palm of your hand.  Doing this will minimize gaps.  Or you could just leave them...Depends on the look you are going for.)


Space the smaller cones over the large ones.  No rhyme or reason for placement here.  After you like the placement of all the smaller cones, begin gluing.  This is your chance to hide some of the gaps between the larger cones.


Again, vary the placement of the smaller cones, allowing some to reach over the outer edges.  After all the cones are connected, gently pull apart at seams and add a dot of hot glue.  


My finished large wreath...


... and for now my favorite wall in the house.

This paper wreath took me all of one hour to complete, start to finish.  If I could give this up it would make a great housewarming gift.  How about using old street maps or encyclopedias?   Dilapidated children's picture books, dictionaries...  Or maybe I'll make a bunch of them all different sizes to fill a huge empty wall space.  Really, so many possibilities.  I think I'll have to make another.


-----------------------------------------------------------------------------------------------------

After a long summer dedicated to our families and gardens we are back to blogging. Joining up again with the lovely Farm Friend Fridays at Verde Farms. If you are stopping by for the first time welcome! There is a lot to see. If you are an returning friend we have missed you after our long hot summer and would love to catch up. Happy Weekend!
Related Posts Plugin for WordPress, Blogger...