
I picked up an interesting book a couple weeks ago. As you know, I love books. To read, yes, but also as craft inspiration. This naval book full of equations, charts and other math stuff needed to be on my walls. What can I say? This house like math.

A couple of Christmas' ago, I made this book wreath. I also made Lauren a larger one. Staring at a bare wall (ha! most of my walls are still bare...) I knew I wanted a big paper wreath too.
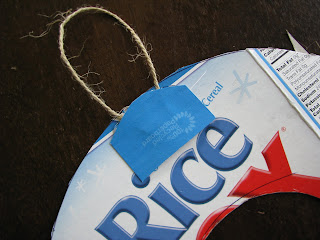
Start with a light cardboard circle. I'm sure you have at least one empty cereal box in your recycling. Grab it. Trace a dinner plate for a large wreath and a salad plate for the little one. Or do both! Cut a hole in the middle.

Cut a six inches of twine and make a loop. Glue it to your cardboard circle.

Add more glue and top it with a small section of more cardboard.
Cut or tear pages from the book. These were coming out ragged when torn so I trimmed them with a blade and a straight edge.

For the large wreath you need both full pages and half pages. For the small wreath, only the half pages. Based on my dinner plate, I needed about 30 of each.

Begin rolling in the bottom corner.

It doesn't matter how tight or loose you roll. In fact you need some of each and even in between to make your wreath worth. Plus the variety adds interest.

When you get to the other corner, add a drop of hot glue then continue rolling. This is my little way not to burn my finger over and over again. Hold it there on the table just for a second to allow the glue to cool.

Do the same with the half sheets of paper. And now you have a collection of paper cones, all different sizes.

Starting with the large cones for the large wreath, glue to the cardboard circle. I like to work in quarters to make sure they are straight. Vary the placement of the paper cones so they aren't perfectly straight in the middle.

Secure a few, then jump ahead and glue. Now fill the space.

Even if the space is small, you can wiggle a cone into the spot.

There will be gaps. (If you are making the small wreath gently separate cones and add a drop of hot glue then press with the palm of your hand. Doing this will minimize gaps. Or you could just leave them...Depends on the look you are going for.)

Space the smaller cones over the large ones. No rhyme or reason for placement here. After you like the placement of all the smaller cones, begin gluing. This is your chance to hide some of the gaps between the larger cones.

Again, vary the placement of the smaller cones, allowing some to reach over the outer edges. After all the cones are connected, gently pull apart at seams and add a dot of hot glue.

My finished large wreath...

... and for now my favorite wall in the house.
This paper wreath took me all of one hour to complete, start to finish. If I could give this up it would make a great housewarming gift. How about using old street maps or encyclopedias? Dilapidated children's picture books, dictionaries... Or maybe I'll make a bunch of them all different sizes to fill a huge empty wall space. Really, so many possibilities. I think I'll have to make another.

-----------------------------------------------------------------------------------------------------
After a long summer dedicated to our families and gardens we are back to blogging. Joining up again with the lovely Farm Friend Fridays at Verde Farms. If you are stopping by for the first time welcome! There is a lot to see. If you are an returning friend we have missed you after our long hot summer and would love to catch up. Happy Weekend!
What an interesting idea!
ReplyDelete