Showing posts with label furniture. Show all posts

Wednesday, April 25, 2012

Goodwill Desk - Polka Dot

On a donation trip to Goodwill a couple summers ago, this ugly little desk caught my eye...


A small investment later it was in the back of my van and settled into a dark corner of my crowded garage.

Fast forward to this spring...

Supplies for summer projects have come earlier than expected and every inch of space possible is needed.  So let's get this desk out of the garage and into the driveway for another refinishing job.

I find lots of inspiration for paint color and design pieces on this site.  While I love the paint color for the body of the desk, a great mix of blue/grey/black, (the same color from the first piece I did) the desk felt way too serious for me.  I wanted something a bit more playful.  Then I found this piece and felt it fit.

I traced a plastic cup for the circles and then free hand painted.  Distressed sanding and a coat of stain... (I really want to start using paste wax, just need to research more about it!)


It's perfect.  I know I say this every time I finish a piece, but I think this might be my favorite.  I originally had pictured this for my son,  Then I recanted and gave it to myself to replace the decopage bookshelf I've been blogging out of.  Brought it in, transferred stacks of paper, pens, cords, magazines, clipboards, electronics and such.  Took a bunch of pictures.  Tried to admire it...


Hmmm... looks weird.  Still love it, just not here.  And a quick tour around my place tells me I need to stop holding onto pieces I fall in love with after refinishing.  Yes.  This will be my first heart break.  My first loss.  He must go...


Any takers?


Saturday, September 3, 2011

More furniture ... Before and After

I have been dreading the start back to school.  Ugh!  Early mornings.  Fighting with the boys over breakfast.   Dealing with tired kids in the afternoon.  And entertaining the girls all by myself.  Could the summer months have already passed?  Did this used to be my life?  

And then the first day,


 and week...


But what's this?  The house?  Spotless and orderly.  The girls?  Perfectly polite and interacting with each other happily.  The boys get up and ready basically by themselves.  The girls wake after they are well on their way to school and we settle into slow, quite days.  

So I have had some time to do fun things like have tea parties, lounge with the girls in my big white bed and tackle some of the furniture in the garage.  You already saw victim number one.  Here is number two.


The top isn't even real wood and did not cooperate when sanding.  Originally I wanted the top to be dark stained wood but that was out of the question.

So after two coats of off white paint I had this...


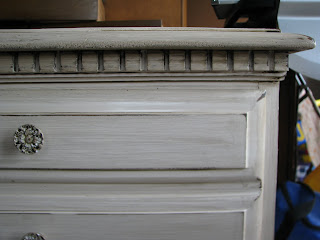
And after distressing and a coat of brown stain, I now have this...


The bottom handles were on the original.  The top four were pulled off some other furniture.  They were gold (of course) so I spray painted them with some cream paint and when they were dry I rubbed them with stain too.  Ahhh... much better!  


I adore how painting, distressing and staining reveal details that were lost on the original finish.  These little squares cut out under the top were completely invisible when it was just boring brown but now its a great eye-catching detail.


But again with the garage finish?  Let me see if I can fix that...


This  painted dresser finds a new home in a small odd spot in the corner of the living room that was until recently occupied by multiple pairs and sizes of mud boots.  Yes, mud boots in the living room.  I think this looks much better.


Hope I can keep it up with the furniture painting and get the garage empty enough to park our vehicles in it before the snow comes.  My mind is busy matching pieces and paint colors.  It is keeping me up at night and waking me in the morning.  I think that is a good thing, don't you? 


Thursday, September 1, 2011

Baby Dresser / Party Pics

When my friend Heather found out she was just barely pregnant she immediately requested that my gift to her be a refinished dresser. Goodness does she know me. I have a basement with half empty paint cans and a garage full of quality wood furniture that simply needed attention. She peered into the packed room and pointed to this little treasure.

Well it wasn't exactly a treasure in that state. Maybe it takes a mother's eye to appreciate that kind of beauty and potential. Yellow greasy finish and sticker residue? I saw through that...

I sanded it to the bare wood and covered it with two coats of a dark blue grey.


While this would be super for a baby bachelor pad, the coastal blues and sea greens she wanted in her nursery would not mesh well with this dark dresser. Back to the basement to mix some paint.

After a thin coat of a light blue grey, I sanded some of the top coat off to reveal the dark underneath. Then I applied stain in a mahogany satin with a foam brush, let it sit a minute and then rubbed it off with a clean towel. The look?


Much better. A quick coat of black flat spray paint on the bronze hardware and the transition was complete. Yes, I lightly sanded the hardware after painting too.


I wrestled a lot with the colors and finish of this piece. Overall I love the look. Its cool blues is a great pop of color for a neutral nursery but the shade and style can grow with the child.


Ahem... Please ignore the lawn mower, kite, saw horses, bike trailer, random rusty items and other dilapidated furniture in the background of these pictures.  Is this the best ta-da I can do?  If I ever plan on selling anything ever I need to learn to stage better.  


.............................................................................................................................................

I'm finally going to do it!

Post pictures from a party that I made something for... I know, you are shocked.  Don't worry, I'm sure I'll get around to posting pictures I promised from summer parties during the frigid and dark winter months when all I have to to is sit inside and stare at this computer screen.  Sigh. 

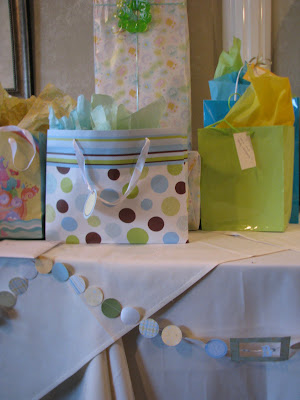
Just last week I posted a bunch of things I was putting together for a very special baby shower for a very special friend and her very special sister.  Yep, a double shower.  Two sisters due just days apart.   Here are a few pics from the occasion...


big sister


little sister

It was such a simple beautiful shower.  There was so much love and support for the girls.  So glad I could be a part of it.  Those are some lucky kids!

Wednesday, August 11, 2010

Inheritance

When you build a big house, everyone has furniture you can "have." And when I hear "have," what I really hear is "ugly." One of the things I received was an old china hutch (that matched the dining table that replaced the picnic table we were dining on in the kitchen. Yes, a honest to goodness picnic table!) It spent a good couple years floating around the basement until I found the perfect project for the piece! Here is my inspiration...

...and this is where i started.

(It was taller but in this pic the legs had already been cut so this cute bench
would fit neatly under my bedroom window.)
This was my first semi-professional furniture re-purposing so bare with me if I include way too many details...

Step 1:
Take off all hardware. Mine had locked doors which literally took me days to pick open and after they were opened I vowed never to put them back in but install generic knobs instead. Removing knobs and hinges may sound elementary but too many times I have rushed through projects neglecting this step and left the final piece looking sloppy. May I suggest collecting all screws and hardware in a ziploc bag. I'll admit that is usually my number one rule but I skipped it until I was halfway through this project and realized I had lost one drawer pull. (It was in the kitchen by the way...)


Step 2:
Sand it. Do you own a random orbital sander? Get one. Love mine. We do this to roughen the surface so the paint will want to stick and not peel off the first time it is challenged. (Again, another step I have unfortunately left out and deeply regretted later.) Start with a lower number sandpaper, say 60 or 100, and sand it once. Then a second sanding with a high number, like 150 or 220. I just used what I had.)


Step 3:

Wash it. Just soap and water, nothing fancy. You want it to be free from sanding dust and storage cobwebs. Now you are probably looking at something like this and wondering what have I done? Push through.


Step 4:
Paint. This is where a few bucks came in on this fantastic remodel. I splurged and bought paint. Usually I use what I have but since I had a picture in my head what I wanted the final product to look like I needed dark paint. I always have tons of paint brushes and foam brushes. You want to make sure to get paint in all the wood details which is why a variety of brushes is a good thing. I did three coats, two of which were in the dark which is probably why it even needed three. You could probably get by with two. I also spray painted the hardware. Now I am begining to see it.


Step 5:
Up until now, these are expected and standard steps in refinishing. Step 5 is to sand again. Hear me out. To give this piece character and interest, I took sandpaper and strategically hand sanded places where normal paint ware would occur, Places like around edges and raised surfaces, corners too. Trust me.


Step 6:
Paint detail. First I sketched it on paper and then drew it on the bench with chalk. Brilliant. Now you can erase with a damp cloth! Mix some paint with whatever colors you have. Something contrasting. Since my base was dark I chose a much lighter shade for the detail. Free hand paint your design. Stand back and admire your creativity! You are amazing!


Step 7:
Put hardware back on. Find ziploc bag with all the parts and pieces. Aren't you glad you didn't skip this step?


Step 8:
Move your beautiful piece to its home! Admire daily.


Related Posts Plugin for WordPress, Blogger...