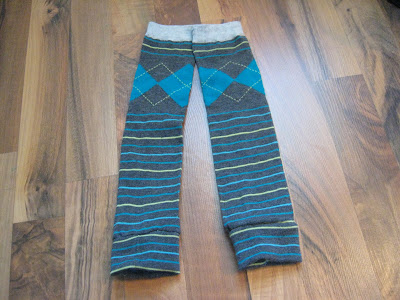
I am a leg warmer freak. Ask anyone who knows me and I have a drawer full of leg warmers and I wear them ALL long winter long. So when I first saw baby leg warmers, I was sold. Then ... I saw the price tag ... ouch! So after some internet surfing I found some great tutorials on how to make your own (I will provide the links at the end of this post).
Yesterday, during a quick shopping trip at Target, I found colorful $2.00 knee high socks. I wear knee highs about as much as leg warmers so I figured a six dollar investment wouldn't be too expensive if my baby leg warmer project didn't work out. I would end up with great new socks! What a treat for mommy.
Side note: I always go to Target with a list. I was looking for a winter hat for my almost 5 month old boy and didn't find one. I redirected that money to the baby leg project. Something else I had already planned on at some point. I will have to make Wade a winter hat.
This morning I was ready to put my project in action. When Wade was playing with toys and napping I was able to make him his first pair of baby leg warmers. In all it took about an hour in total. I was hand sewing because I don't have a sewing machine but with a sewing machine this project could take 15 minutes to 1/2. Here are the steps.
Step 1:
Gather supplies. I didn't have my sewing supplies on hand so I used some embroidery floss instead.
Step 2:
Cut your socks as shown. I removed the heal and toes of the socks and left two rectangles.
Step 3:
This step is one that I would have changed. I used an idea I saw on one of the Internet sites that made the smaller rectangle a cuff. I love the cuff but the post had you make the cuff slightly smaller by sewing up the side. I would have skipped sewing up the side. Not that it isn't a great idea but in the long run I don't think it is necessary for the end product and would have saved more time. The image shows the smaller rectangle from the foot of the sock turned inside out (on the right) and sewn up the side. When finished sewing up the sides I folded the piece down on itself to form the cuff (on the left).
Step 4:
Next I took the longer rectangle, the leg of the sock, and inserted in inside the newly made cuff (on the right). Using my embrodery floss, I stitched the unfinished edges together (about .25" in). Be sure not to sew the hole closed. At all times I had three unfinished edges in my hand. When finished I turned the cuff down and had one finished baby leg warmer (on the left).
Step 5:
Do other sock the same way. Here are the finished baby legs.
Step 6:
Show off your cute baby and his baby legs!
http://beadedsocks.net/legging.html
http://everythingyourmamamade.com/2008/01/21/make-your-own-baby-leg-warmers/


No comments:
Post a Comment