Showing posts with label paper. Show all posts

Tuesday, September 6, 2011

Paper Wreath

I picked up an interesting book a couple weeks ago.  As you know, I love books.  To read, yes, but also as craft inspiration.  This naval book full of equations, charts and other math stuff needed to be on my walls.  What can I say?  This house like math.


A couple of Christmas' ago, I made this book wreath.  I also made Lauren a larger one.  Staring at a bare wall (ha! most of my walls are still bare...) I knew I wanted a big paper wreath too.   

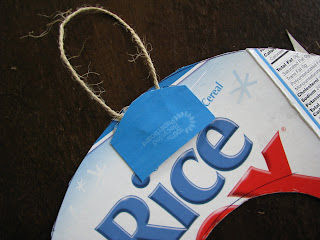
Start with a light cardboard circle.  I'm sure you have at least one empty cereal box in your recycling.  Grab it.  Trace a dinner plate for a large wreath and a salad plate for the little one.  Or do both!  Cut a hole in the middle.


Cut a six inches of twine and make a loop.  Glue it to your cardboard circle.  


Add more glue and top it with a small section of more cardboard.

Cut or tear pages from the book.  These were coming out ragged when torn so I trimmed them with a blade and a straight edge. 


For the large wreath you need both full pages and half pages.  For the small wreath, only the half pages.   Based on my dinner plate, I needed about 30 of each.


Begin rolling in the bottom corner.   


It doesn't matter how tight or loose you roll.  In fact you need some of each and even in between to make your wreath worth.  Plus the variety adds interest.  


When you get to the other corner, add a drop of hot glue then continue rolling.  This is my little way not to burn my finger over and over again.  Hold it there on the table just for a second to allow the glue to cool.


Do the same with the half sheets of paper.  And now you have a collection of paper cones, all different sizes.


Starting with the large cones for the large wreath, glue to the cardboard circle.  I like to work in quarters to make sure they are straight.  Vary the placement of the paper cones so they aren't perfectly straight in the middle.


Secure a few, then jump ahead and glue.  Now fill the space.


Even if the space is small, you can wiggle a cone into the spot.  


There will be gaps.  (If you are making the small wreath gently separate cones and add a drop of hot glue then press with the palm of your hand.  Doing this will minimize gaps.  Or you could just leave them...Depends on the look you are going for.)


Space the smaller cones over the large ones.  No rhyme or reason for placement here.  After you like the placement of all the smaller cones, begin gluing.  This is your chance to hide some of the gaps between the larger cones.


Again, vary the placement of the smaller cones, allowing some to reach over the outer edges.  After all the cones are connected, gently pull apart at seams and add a dot of hot glue.  


My finished large wreath...


... and for now my favorite wall in the house.

This paper wreath took me all of one hour to complete, start to finish.  If I could give this up it would make a great housewarming gift.  How about using old street maps or encyclopedias?   Dilapidated children's picture books, dictionaries...  Or maybe I'll make a bunch of them all different sizes to fill a huge empty wall space.  Really, so many possibilities.  I think I'll have to make another.


-----------------------------------------------------------------------------------------------------

After a long summer dedicated to our families and gardens we are back to blogging. Joining up again with the lovely Farm Friend Fridays at Verde Farms. If you are stopping by for the first time welcome! There is a lot to see. If you are an returning friend we have missed you after our long hot summer and would love to catch up. Happy Weekend!

Wednesday, August 24, 2011

Baby Shower Decorations

My dear friend Heather is expecting her first baby this fall. Isn't she adorable. She totally humors me and will pose whenever and wherever I want for a photo. The best!


I am truly giddy for her. Babies are my favorite with parties as a close second, as if you couldn't tell. So of course I wanted to help in any (creative) way possible and basically begged her to let me put together some pretty things for her baby shower. With only a handful of ribbons, a stack of scrapbook paper and a few odds and ends, here is what I came up with.

All baby showers need cupcakes, or so I'm told. Maybe its the similarity of size between the bite sized cakes and the baby to be... who knows? But they will look cute stacked high on these spiffed up cardboard towers.


And if there are cupcakes there must be cupcake toppers...


I thought it would be fun to have pinwheels. So first I made big ones...


and then more... slightly smaller....


and even more... even smaller....


They were a breeze to make. Start with a square. Cut from the points towards the middle, leaving about a square inch in the middle not cut. Put a generous dot of hot glue in the center and pull the same pointed end of each quarter towards it. Secure on top with a button. Turn it over and use another dot of glue to stick a skewer to the pinwheel. Cover the pointy end with paper.

Safety first... cover that pointy end!

Medium -- Small -- Large

Heather wanted to showcase some of her mom's cut flowers at the shower as centerpieces. Rather than use vases, we decided on mason jars.


There are a dozen jars adorned with ribbons, buttons and stickers (from the scrapbook paper).

She loved the paper garland I made for the boys birthday party this summer so I thought I would sew up a ton to put some color on the walls too.


I had a huge stack of paper circles sitting next to my sewing machine and I would randomly grab them and stitch them together. I was also reading books to the little one, discussing supper ideas, and probably playing cards with the boys so my sewing wasn't at its best...


There are 2 - 20ft long strands for the walls and a couple shorter 6-8 ft strands for tables. To store and travel, I secure one end of the strand to a box or piece of cardboard with tape and wrap up and down the box. For the second strand, I wrap the other way, side to side, securing the other end with tape to finish. I alternate until all the garland strands are on the box.


Now just to keep all of these delicate paper creations out of little hands until this weekend...


Hope you love them, Aunt Feather (as Eden calls her).

Wednesday, January 26, 2011

W.A.D.E.

Wood letter craft. This is the step by step guide to how I spruced up some rough wood letters.

After my lovely little one was 3 months old, I was finally able to start making his nursery personal. I had purchased the rough wood letters at a local craft store but had not decided how I wanted to use them in Wade's room. Note: We knew we were having a boy and had settled positively on his name before spending money on the letters.


Step 1:
Gather supplies. This part was easy for me because my room looked like and explosion of crafting and art supplies because I was in the middle of organizing them.


Step 2:
These were solid wood letters but were roughly cut so they needed some sanding. I grabbed a sand paper block (medium grain) and sanded away rough edges and wood splinters.


Step 3:

Painting. I knew I was concerned about the edges of the letters more than the fronts and backs. I had another plan for the front of the letters. My husband offered to spray paint the letters for me in the garage. I accepted his offer thinking that I just saved myself a chunk of time. But it turns out "spraying" the sides of the letters didn't quite cover to my satisfaction. So I used an artists paint brush and some white acrylic paint I had to paint the edges in a nice thick coat. Only one coat was needed. Don't forget to have a helper.


Step 4:
Next I selected the paper I wanted to cover the front of the letters. Wade's nursery theme was woodland creatures which inspired our baby shower invitations among other things. I found a large book of scrap book papers that were a perfect match for the woodland theme. Even better the book was on sale at the same local craft store the wood letters were bought at. (Bought at a separate time though).


Step 5:
I flipped the paper over and the letter over and traced the letter onto the back of the paper as shown. Using my X-acto knife I cut out by hand (I have a really steady hand) the letter. Repeat for as many letters as you have.


Step 6:
Using glue and a paint brush I applied glue evenly on the back of each paper letter and placed the paper on top of the wood. I used heavy books and objects to press the paper down on the letters for almost 24 hours. I repeated the process for all the letters.


Now hang on your wall and enjoy!
Related Posts Plugin for WordPress, Blogger...