Showing posts with label Gluten Free. Show all posts

Friday, February 21, 2014

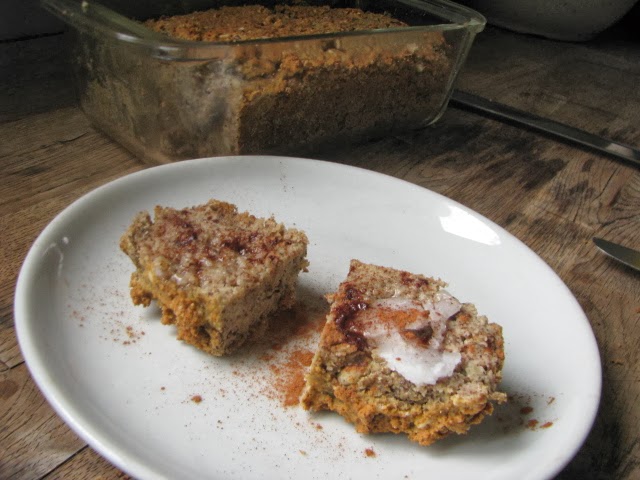
Good Food Friday: Grain Free Bread (Almond and Coconut Flour Bread)

I know, the name says it all.

Grain-free bread?

Doesn't even the most basic definition of bread involve, well, grain?

Yes.  And all of my homemade bread recipes involve all kinds of combinations of grains.  Rice. Quinoa. Oat...


But not this one.  I have been experimenting with almond flour for years.  Years.  And most of my recipes have been, honestly, barely edible by my definition (but not by the rest of the household, thankfully!).  This one was a success on its first attempt and verified in the weeks since.  I don't really follow all the eating styles and labels on foods theses days so I don't know who can enjoy this but it sure is a treat around here.  A nice slice with a bit of coconut oil has been my comfort food lately!


Grain Free Bread (Almond Coconut Flour Bread)


Ingredients:

  • 1 1/2 cups blanched almond flour
  • 1/2 cup coconut flour
  • 1/4 cup ground flax seeds
  • 3/4 tsp baking soda
  • 1/2 tsp salt
  • 1 Tbsp xylitol (you can use honey or sugar as well)
  • juice of 1/2 a lemon
  • 4 eggs
  • 1/2 to 3/4 cup water
Directions:
  • Preheat the oven to 350* F and grease a *slightly smaller glass loaf pan* with coconut oil. 
  • Combine dry ingredients and mix well.  Add lemon and eggs and mix well.  Start with the 1/2 cup water and mix until the dough resembles a stiff cake batter.  
  • Scoop batter into the loaf pan and smooth with wet finger or a wet spatula.  Don't worry, it will rise and fill more of the pan, I promise.   Bake for 35 minutes.  
  • Allow to cool.  Slice in pan.  Keep covered when stored.
This bread blew me away in the fact that unlike so many of the gluten free breads it continued to stay moist until the very last slice, about a week!  If you know gluten free bread, that is a miracle!  


Also, this is not a sweet bread.  If you like your stuff more on the sweet side, double the sweetener, or top with raw organic honey and a sprinkle of cinnamon (my preference)!


** Here is what I mean about the slightly smaller loaf pan.  Although both pans say 1.5 quart, this loaf was
baked in pan on the left.  It looks slightly more narrow than the one on the right.  Am I crazy?  By about an inch.   I bake all my gluten free loaves in this smaller pan because they tend to get a better rise.


Friday, February 14, 2014

Vegan Gluten Free Kani Salad

Remember Good Food Friday?

Well I am happy to say we have still been eating plenty of good food just not posting our recipes.  This has to change.  Not only so we can share our inventive eats but so we can have a record of them too.  Oh how many times I have searched my own blog for my own recipe!

This one is new to me.  Kani salad.  Ever heard of it?  Introduced to me this past weekend by some food adventurous friends.  It's basically cucumber and crab with spicy mayo. But it is never real crab at these places.  No.  That fake stuff. Made with random pulverized fish, weird food starches, poor quality vegetable oils and probably MSG? Definitely not on the gluten free or real food list.  So here is a cleaned up version.


(Excuse the terrible phone photo.  Next time I promise to snap a shot with my real camera
 before I devour.  But trust me, it's beautiful...)

Spicy Kani Salad


Ingredients:
  • cucumber, julienne (I use this handy tool)
  • vermicelli rice noodles, cooked and cooled  (I tend to keep this on hand soaking in the fridge.)
  • vegan mayo - I used Vegenaise (or my Creamy Garlic Tofu Dressing, to follow)
  • sriracha
  • brown rice vinegar
  • sesame seeds
Directions:
  • Toss cucumber and noodles. I tend to always use more veggies than noodles.
  • Top with a dollop of mayo, a squirt of sriracha and a splash of vinegar and a sprinkle of sesame seeds. Toss to coat evenly.   Adjust to taste!
I think the noddles basically nail the texture of fake crab, if fake crab could be considered desirable, if only for texture. This is pretty basic but I think it would be fun to add shredded carrot for more color, or tuna for protein, all on a bed of lettuce for a meal.  Some versions add mango for a slightly sweet yet spicy side dish.


And it always tastes better when eaten with chopsticks!

******************************************************

Creamy Tofu Garlic Dressing


Ingredients:
  • 8 oz organic tofu
  • 2 Tbsp cider vinegar
  • 1 Tbsp lemon juice
  • 1 Tbsp Braggs liquid aminos
  • 1 squirt mustard
  • 1 clove garlic
  • 1/4 cup organic olive oil 
  • 1/3 cup water
Directions:
  • Blend first 7 ingredients in a blender.  I used my Vitamix but I'm sure this would work in any decent blender. With blender running, slowly add oil in a thin stream.  Then add water the same way until you reach desired consistency.  It will look questionable a few times but it will come together in a beautiful creamy sort of way.
Use this as a dip base or as a mayo replacement.


Friday, October 5, 2012

Corn Free Dairy Free Vegan Caramel

There is something about fall that makes certain foods more appealing. You know what I'm talking about... all things apple and/or caramel.  But you throw in a food allergy like dairy or corn and literally half of the most tempting fall deserts are eliminated.  Caramel is by definition butter, sugar and milk.  When planning my daughter's early fall birthday party this year I was determined to figure this one out: a dairy free and corn (syrup) free caramel for caramel chocolate covered apples.

I started with this basic recipe.  The proportions seemed right and I would only need to attempt one major substitution.  When you are playing with specialty ingredients, it can get expensive so you want to do most of the guessing before you actually start.

Please read through instructions a couple times before attempting.  I promise after you make it once, it will all make perfect sense the next time!

Ingredients:
  • 2 cups organic sugar
  • 2 cups almond milk
  • 1 cup agave 
  • 1 cup earth balance or your normal butter substitute
Equipment required:
  • large pot, at least 6 quart
  • candy thermometer
Instructions:

Place all ingredients in you pot and clip your candy thermometer onto the side.  Warm over low to medium heat.  I hovered around a three or four.  Stir, stir, stir.  The liquid will boil at 212*F and stay at that temperature until the water has evaporated.  Eventually the mixture will begin to rise in temperature again and being to thicken.  Around 230* you will begin to see a significant change, this is about 30 minutes since you started.  The mixture will bubbly continuously.  Keep stirring.  When the mixture reaches 245* the resulting caramel will harden when cooled.  You can test this by spooning some onto a plate and placing it in the freezer for just a minute.  When you take it out it should be very hard, not runny at all.  At this point, you can either pour the hot caramel into a buttered baking pan (8 X 8) and let cool, or you can allow it to cool and thicken slightly in the pot 
and dip clean, dry organic apples into to caramel.


You can see in this picture how my caramel pooled around the base of the apple.  That is just because I am impatient and began dipping my apples in the very hot caramel.  The second tray came out much better!  

After allowing the caramel apples to harden (about 20 minutes) I dipped them again, only halfway this time, in chocolate (corn free and vegan enjoy life chips) mixed with a couple tablespoons of almond milk to thin it.  I then quickly dipped the apples in either chopped almonds (for the adults) or sprinkles (for the kids)!

so festive!

The apples were a huge hit.  It wasn't until later that I realized I served sugar (organic apples) covered in sugar (corn free dairy free caramel) dipped in more sugar (chocolate)!  Wow, maybe next time I'll just make the brownies... but even they are better with caramel! 


(If you want to keep the caramel in a liquid state to use as a sauce for brownies or ice cream or even in a hot fall beverage, heat only to 230*F and keep it in a glass jar with a tight lid and refrigerate.  Yum!)


Friday, April 27, 2012

Good Food Friday: Chocolate Apricot Bars

I love the idea of unprocessed food.  Real food.  Whole food.  Foods that heal.  That benefit my body.  I would say I eat this way about 80% of the time. The 20% of the time that I don't is normally for dessert.  But why?  Because healthy desserts have a nasty reputation for being boring, tasteless or just plain weird. As I have been reading more and more, learning about how individual ingredients function in a recipe it is getting so much easier to discover satisfying sweets that fit in the whole unprocessed category.  

Like this.  


Almost completely nuts and fruit this is just about the healthiest treat I can imagine.  And with the addition of dark chocolate chips, it tastes indulgent.  Almost like a granola bar I'm betting this will be great in the morning with a piece of fruit and mug of hot tea for breakfast!


Chocolate Apricot Bars (Gluten Free)

Ingredients:
  • 1 cup ground almonds (I did mine in a coffee grinder, but a food processor would work too)
  • 3/4 cup rice flour
  • 1 cup coarsely chopped walnuts
  • 1/2 cup chopped dried apricots 
  • 1/2 cup dried cranberries
  • 2 eggs, beaten
  • a few tablespoons water
  • pinch of salt
  • 1/2 dark chocolate chips


Directions:
  • Preheat oven to 350*.  Lightly grease an 8X8 baking dish.  
  • Combine dry ingredients besides chocolate.  
  • Add beaten eggs and mix with a fork until ingredients are no longer dry.  If the dough is not sticking together, add water a tablespoon at a time. 
  • Add chocolate chips.  
  • Lightly press dough into the pan.  Bake for 25 minute.  Allow to cool or if you can't wait, go ahead and sneak a square.  They hold up well (if you eat gluten free and avoid synthetic binders you know what I mean) and are quite filling.


Inspired by Elana's Pantry


P.S. I was right... they do make an excellent breakfast!


Friday, February 24, 2012

Good Food Friday: Roasted Romaine

 I don't think there is a vegetable that tastes anything less than incredible drizzled with olive oil and roasted in the oven.  Some totally explainable choices are beets, broccoli and tomatoes.  But lettuce?  Won't it just taste like warm salad?  Honestly the idea never crossed my mind.  But there it was in this months Bon Apetite, roasted next to Caesar chicken breasts.  It was gorgeous and I immediately took mental stock of my fridge and vow to make this vegetable.

Here is my lovely romaine.  Washed, dried well and cut in half lengthwise.  I drizzled them with olive oil cracked pepper and a bit of shaved parm cheese.  

Before a 450* oven for a very short 5 minutes (watch it!) ...


And after.  This picture makes me smile!  The romaine became slightly brown and was curling at the tips. And so very soft.    It becomes totally different than its raw crisp former self.  


Veggies are the main show of this supper and my goodness, I had seconds of everything! The romaine was warm and juicy.  It was a totally new way to serve a rather plain and predictable veggie.  You can bet I'll be craving this again... very soon!


Friday, January 6, 2012

Good Food Friday: The Ups and Downs of Gluten Free

No actual recipe today friends.  Just a story about food... 


I love a challenge, in the kitchen that is.  There is such a feeling of accomplishment when I can convert a conventional recipe to a healthier version.  It started with changing simple ingredients like sour cream to homemade yogurt or butter for applesauce.  Then I ventured into adding some extra things like nuts or seeds.  I was feeling good, making things from scratch with almost 100% success, cutting out all the fillers and extra processed components of recipes.

About 4 years ago our family physician suggested we try our second son on a gluten free diet.   My first thought was I am totally up for this; he will miss out on nothing.  I read and studied and experimented and tested, learning the properties of the various flours and the ratio of butter to eggs.  I was really proud of my accomplishments.  I even found a decent recipe for bread.  (The store bought stuff while gluten free had a TON of extra processed garbage in them!)  So basically the entire family went gluten free.  It was not a difficult decision to make, it was simply easier than making two different meals. Minus the bread.  There will always be two kinds of bread in my fridge, both homemade, one spelt the other gluten free.

A year ago, in another challenging attempt to save a few bucks, I bought a pasta machine.  Not one of those you can see in the late night infomercials that blend and extrude but the shiny old fashioned metal kind with the clamp and the crank.  Oh it is beautiful.  Once a week, usually Thursdays, I bring the machine down from the top shelf in the pantry, pour myself a glass of red wine (what is a good pasta dinner without one!) and crank out the good stuff.


Honestly, it's  okay.  This is the one thing that is killing me about gluten free.  I have done so much reading and testing that I feel by now I should have struck gold, but I'm still not happy.  So much of pasta making is in the ingredients.  I have used only farm eggs and fresh ground rice flour.  But the one thing I absolutely do not want in my pasta are the very ingredients that determine its success... fillers.   Starches.  Empty calories.  Corn based binders.  Really?  I have come all the way to run into this.

Yesterday all I could think about was making ravioli.  At two, I assembled the fillings.  At three I had finished researching a new pasta recipe.  By four, I was making a second batch of dough, with my standard and somewhat disappointing recipe.  Big sigh.  Huge sigh.  Here is what the four hour project/finished ravioli looked like...


and you can see by my kids plates they had no complaints.


Neither did my husband...

But by my fourth square, I was done.  It did not taste like I wanted it to.  Like I dreamed about all afternoon.  Like I remember before going gluten free.

So why?  Why keep on trying?  Keep falling short...

Because the chance of success, a total complete success, is just so close. This entire post may see kind of negative but I promise you I never see it that way.  In my experience, all of the best things I have achieved were difficult.   Having kids young.  Getting through school.  Learning to cook and bake.  Being involved.  Having more kids.  Building a home.  Making time to be me.  Having one more kid.   Soon I will have this under my belt too.   I have learned so much.  I'm sure I take most of it for granted now, I know the kids do, in a good way.  They know that I can make anything and never doubt my experiments.  So I'll keep going and failing and succeeding because in the end I believe it is the journey that counts.

How about you? C'mon, share your success/failure stories...

------------------------------------------------------------------------------------------------------------------

Gluten Free Inspiration -- some sites I visit often for all their yummy recipes and super ideas!

Gluten Free Recipes - Elana's Pantry
Elena's Pantry :  A very clean and simple site with awesomely nutritious foods

Making Love in the Kitchen :  Meghan is an inspiration!  All her foods are insanely creative and yummy!


Know of any others???  Share the love... We gluten free people need to stick together!

------------------------------------------------------------------------------------------------------------------

Also, don't forget to let us know you are out there and reading!


Related Posts Plugin for WordPress, Blogger...